Purple Patch
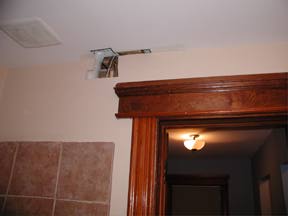 My first hole in the wall is now my first spackling. I had, with trepidation, cut a hole in the drywall and ceiling above the back of the shower. I needed a way to stop the tiny drip that came out of the PVC elbow from rain water entering the sewer vent pipe. The hole in the wall became an oddly shaped jigsaw puzzle as I sawed in different directions looking for the leak, and running into studs, fan vent tubes, and telephone wires up to the bike workshop in the attic. I cut very slowly and shallow until I could identify all the local electrical wires. I'm pretty sure cutting into them would have been a "very bad thing."
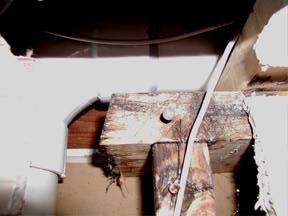 I eliminated the rubber coupler from the plan. It was just too big to fit up in there without major deconstruction. I cleaned the PVC pipe near the leak and roughed it up with sand paper. The epoxy clay came in a tube form, with blue clay on the outside, and white in the core. I cut off a section of it and started kneeding as the instructions said. The smell of mysterious chemicals mixing wafted into my nose, reminding me of a couple times as a kid when I watched my dad mixing liquid epoxy. The clay was surprisingly stiff and by the time I'd kneeded it into a uniform color, as instructed, it was several minutes later and my hands felt like my thighs after a time trial. I rolled it into a long thick "string" of clay and pressed it into the PVC joint.
 The dripping water had rotted some of the wood under the pipe, but it was only on the surface and the wood was still plenty sturdy. After a day of curing, the clay was as hard as the PVC and I was satisfied that the leak was no more.
I found some spare sheetrock the previous owners left in the basement and cut two jigsaw pieces to fit into the hole, one for the ceiling and one for the wall. Four drywall screws secured the pieces to the studs.
Never having taped drywall before, I bought some self-stick tape that claimed to make joining drywall very easy.
 Just peel the backing, stick it on, and spackle. No need to lay down a base layer of joint compound. Sounded great. In the end, it worked fine, but I wouldn't want to use it for large jobs. It took me about four minutes per piece of tape to get my fingernail under the backing of the tape to peel it off. Most of the time, my fingernail would separate the two layers of the paper tape itself, curling up a corner, rather than peeling the backing. In hindsight, laying a base layer of compound probably would have taken a fraction of the time.
 The compound I bought turned out to have a color-change indicator, so it went on pinky-purply and turned white when it dried. Very slick. When it all turns white, then you're okay for the next coat or sanding. Because my patches were'nt flush with the wall, I've had to put on three coats so far, concentrating on filling in the depressions. I've been using pretty thin coats to try to avoid cracking during drying. Presently, the patch is all white and I'll be sanding it this weekend. I might end up adding another coat, but I'm going to see if I can even out the low spots by sanding before I slather on more spackle.
Sue's busy trying to decide if she wants the bathroom a different color for when painting time comes. She's not crazy about the cream/tan and thinks white with a touch of blue in it might highlight the few blue tiles in the floor and counter. One thing is definite. We're going to try to do it right this time and prime the patched area with a stain killing and covering paint, and we're going to choose a final paint especially made for the humidity of bathrooms so we'll be less likely to see the stain come through again.
My parents are coming for their first visit to the new house in a little over a week, so we're scrambling a little to try and at least clean up around the ongoing projects and hang some of our pictures and what not. Hopefully any picture hangers we drive into the walls will go well and not create any more spackling jobs right away!
posted by Tim Bingham @ 9:37 AM
0 comments
![]()

0 Comments:
Post a Comment
<< Home